
As you browse your local store searching for the perfect snack, a label captures your attention with its vibrant colors and catchy design. That’s the power of labels—they’re more than just stickers; they’re storytellers.
In this guide, we’ll show you how to make labels that pack a punch. We’ve got you covered, from brainstorming ideas to mastering the art of printing. Whether you’re a newbie entrepreneur or a seasoned pro, get ready to unleash your creativity and make labels that turn heads and drive sales.
The ultimate guide to label designs
What do you need to make your label?
The equipment you’ll need to start the label-making process depends on whether you choose to make your labels at home or seek the assistance of design and printing professionals like those of 99designs by Vista and VistaPrint, respectively.
If you turn to professionals for help, all you need is a solid label idea to communicate to the designer and the money to fund it. The rest will be taken care of.

Source: by Unigram via 99designs by Vista
However, if you want to DIY any part of the label-making process—whether it’s designing, printing or both—you’ll need to have both the idea and the right equipment at your disposal:
- Design software like Microsoft Word or free online graphic design tools like VistaCreate to create your label’s layout and design.
- A computer to design the label and a printer to produce physical labels. Consider a high-quality printer if you’re printing at home.
- Label paper: Choose the right type of label paper for your project from standard adhesive paper, waterproof labels, clear labels or specialty papers, depending on your needs
- Scissors or a cutting machine for precise trimming of your labels if they do not come pre-cut
- Enough ink or toner for your printer to produce vibrant and clear labels
- Creativity and design elements, like logos, images, text and color schemes that represent your brand or the information you need to display on the label
- Product information like ingredients, usage instructions, barcode and regulatory information, if required for your product
- Test materials, including additional paper or label stock, for running test prints to ensure everything looks right before the final print
And, of course, if you’re new to creating labels, you’ll also need lots of patience and attention to detail—experiment with tweaking your designs and final products several times before you achieve perfection.
Types of labels
Depending on the purpose your labels serve, it’s possible to differentiate between seven key types of labels.
- Product labels serve as a communication tool between the product and the consumer. They inform purchasing decisions and ensure product safety and compliance.
- Shipping labels identify packages and facilitate their movement through the shipping and delivery process. They typically include sender and recipient addresses, tracking numbers and any special handling instructions.
- Barcode labels contain machine-readable barcodes that encode information such as product identifiers, inventory codes or pricing details. They’re commonly used in retail and logistics for inventory management, tracking and automated checkout processes.
- Security labels deter tampering, counterfeiting or unauthorized access to products or sensitive information. They may feature tamper-evident seals, holographic elements or unique identification codes to enhance security and authenticity verification.
- Food and beverage labels specifically cater to food and beverage packaging and labeling needs. They provide essential information such as nutrition facts, ingredients, allergen warnings and expiration dates to comply with food safety regulations and inform consumers about the product’s contents and characteristics.

Source: via VistaPrint
- Environmental labels, such as eco-friendly or recyclable, indicate that a product meets certain environmental standards or certifications.
- Hang tags are small labels attached to products using strings or hooks that serve as branding and marketing tools. They provide additional information about the product, such as pricing, promotions, product features or care instructions.
The eighth type of label is roll labels. When mass-produced, labels usually come wrapped on a roll. Roll labels are ideal for high-volume labeling in retail, logistics and manufacturing.
For more information about key label types and how to choose the right one for your specific needs, check out our guide to types of labels.
How do I create a label? A step-by-step guide to label design
Choosing the right label type for your business is crucial. It’ll impact the whole label design process, from what information to put on your label to preparing the final design for print. Speaking of the label design process… Stick with us as we cover everything you need to know in 5 easy steps!
1. What should you put on your label?
The must-have information you need on your label will vary depending on the type of label you want. For reference, let’s break down the contents of a product label—as these tend to contain the most information.

Elements of a typical label design. Source: by BrSav via 99designs by Vista
Required information on your product label:
- Product name: Clearly state the name of the product or item.
- Brand logo: Display the logo or brand identity to establish brand recognition.
- Ingredients or materials: List all ingredients or materials used in the product, especially relevant for food, cosmetics and textile products.
- Usage instructions: Provide clear instructions on how to use the product safely and effectively.
- Safety warnings: Include any necessary warnings or precautions for safe usage, such as allergen warnings or age restrictions.
- Expiration date: Indicate the expiration date or best before date, particularly for perishable or consumable products.
- Quantity or weight: Specify the product’s quantity or weight in the packaging.
- Manufacturing or production information: Include details such as the manufacturing date, batch number or country of origin.
- Barcode: Encode a unique barcode for inventory tracking, retail sales or product identification purposes.
- Contact information: Provide contact details for the manufacturer, distributor or customer service department for inquiries or feedback.
- Legal disclaimers: Include any necessary legal disclaimers or disclosures required by law or regulations, such as liability limitations or warranty information.
- Graphic symbols: Use universally recognized symbols or icons to convey information quickly and efficiently, such as “fragile” symbols for delicate items or “recycle” symbols for eco-friendly products.

Source: ludibes via 99designs by Vista
Additional elements for your product label (not required):
- Product description: Provide a brief description of the product, including its features or benefits.
- Promotional messages: Incorporate promotional messages, special offers or loyalty program details to encourage repeat purchases or brand engagement.
- Certification symbols: Display any certifications, quality marks or regulatory compliance symbols relevant to the product, such as organic, kosher or safety certifications.
- Environmental information: Include eco-friendly or recycling symbols to indicate sustainable practices or disposal instructions.
- QR codes or URLs: Direct consumers to additional information, resources or online platforms related to the product through QR codes or website URLs.
2. Choose the right tools to design your label
When designing labels, the right tools are crucial to achieving a professional and eye-catching result. Whether you prefer a DIY approach or enlist professional designers’ expertise, various tools are available to suit your needs.
DIY label design tools

Label creation process. Source: via VistaCreate
VistaCreate offers a user-friendly online platform with customizable label templates and design elements specifically for label creation. With intuitive features and a vast library of graphics and fonts, VistaCreate simplifies the design process for beginners and experienced users.
Adobe Suite (Illustrator, Photoshop)
For those seeking more advanced design capabilities, Adobe Illustrator and Photoshop provide powerful tools for creating custom labels with precision and creativity. These industry-standard software packages offer extensive design functionalities, allowing complete control over every aspect of the label design.
Microsoft Word
While not specifically designed for graphic design, Microsoft Word can still be a viable option for basic label design tasks. With built-in templates and simple formatting tools, Word offers a straightforward solution for creating labels, especially for text-based designs.
Professional design services
If navigating the world of label design feels like tiptoeing through a maze blindfolded, there’s a solution that doesn’t involve summoning the design gods. Getting professional help from one of VistaPrint’s design services, like 99designs by Vista, will have expert designers ready to swoop in and save the day. By teaming up with a designer who understands your brand aesthetic, you’ll sail through label creation smoother than a hot knife through butter!
Choosing between DIY label design and professional assistance depends on budget, time constraints and design expertise. While DIY tools offer convenience and cost-effectiveness, professional designers bring expertise, creativity and a refined design sensibility.
If you decide to take the DIY route, proceed with the following steps. If you need help, you can skip ahead to learn more about designing labels or how to prepare for print.
3. Set up the design space for creating the label
Dimensions and orientation
Begin by determining the size and orientation of your label based on your product packaging and design vision.
Consider factors such as the size and shape of the product packaging, the amount of information to be displayed on the label and the desired visual impact.
Here are some common label dimensions and orientations used in various industries:
1. Rectangle labels:
Standard dimensions: 2″ x 3″, 3″ x 5″, 4″ x 6″
Orientation: Landscape or Portrait

Source: Rectangle label designs by MANTSA® via 99designs by Vista
2. Circle labels:
Standard diameters: 1.5″, 2″, 3″
Orientation: N/A

Source: Circle label design by Agi Amri via 99designs by Vista
3. Square labels:
Standard dimensions: 2″ x 2″, 3″ x 3″, 4″ x 4″
Orientation: N/A

Source: by Zoe Shtorm via 99designs by Vista
4. Oval labels:
Standard dimensions: 2″ x 1″, 3″ x 2″, 4″ x 2″
Orientation: N/A

Source: via Depositphotos
However, if the standard dimensions and shapes don’t work in your specific case, don’t feel pressured to stick to them. You can go with custom dimensions and shapes tailored to fit specific product packaging or design requirements. For example:

Source: an example of an unusual label shape by Wooden Horse via 99designs by Vista
Important canvas preparation guidance
When setting up your canvas in your chosen design tool, it’s crucial to optimize for printing labels with the highest quality.
- Aim for a resolution of at least 300 dots per inch (DPI) for crisp and clear printing quality.
- Set your canvas to the CMYK color mode.
- Choose a color profile suitable for your printing method and label’s intended use. For most print projects, using the “Coated” color profile, such as “Coated FOGRA39” or “Coated GRACoL,” is recommended.
Layout and grids
Layout grids or guides are essential for achieving a balanced and professional label design. They ensure consistency, alignment and readability by providing a framework for organizing elements such as text and images.
By using grids, you establish visual hierarchy, streamline the design process and create a cohesive and visually appealing label.
4. Design your label
Choose the color scheme and the fonts for your label
The right color scheme and fonts for your label create a design that resonates with your target audience and reflects your brand identity.
Opt for colors that complement each other and create a harmonious palette. This ensures your label is visually appealing and easy on the eyes, enhancing consumer perception and engagement.
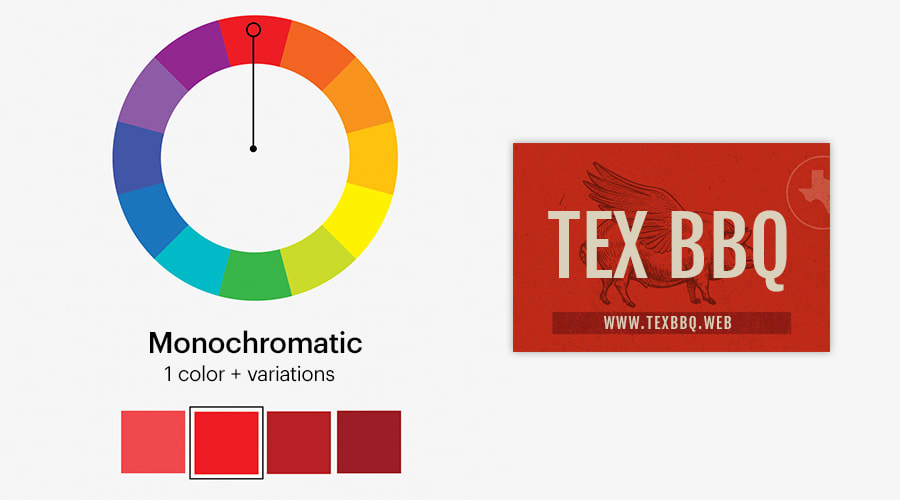
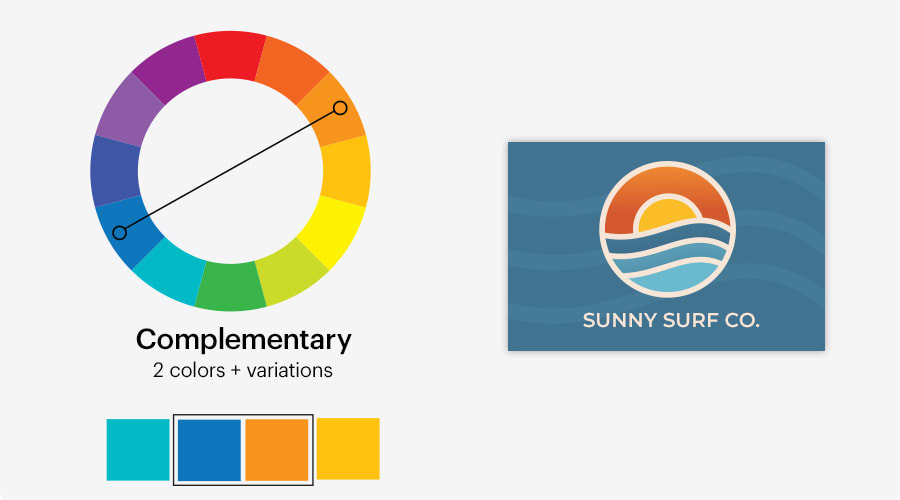
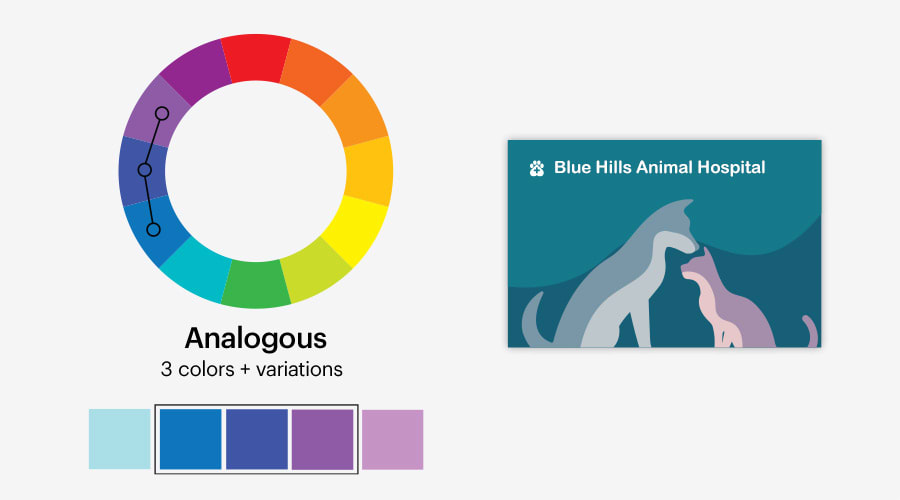

Consider the preferences and tastes of your intended audience when choosing colors. Colors can evoke different emotions and associations, called color psychology, so selecting hues favored by your target demographic creates a stronger connection with them.
For example, blue is often associated with trust and professionalism, while yellow evokes warmth and optimism. Choose colors that align with the emotions you want to evoke and the message you want to convey through your label.
Finally, don’t forget to incorporate your brand colors into your label design. It ensures coherence and continuity across all brand touchpoints. Consistent use of brand colors enhances brand recognition and reinforces your brand identity in the minds of consumers.
The same goes for your font choice. Stick to a maximum of two or three fonts to maintain readability and visual consistency. Ideally, use fonts that are part of your brand’s identity to reinforce brand recognition and continuity.
Incorporate visuals
When it comes to label design, visuals are the key ingredients that transform a plain label into a captivating masterpiece. Here are a few visual ideas to incorporate into your logo design:
- Brand logo: Your logo is the cornerstone of your label design. Make sure it’s clear, recognizable and aligned with your brand’s aesthetic.

Source: Label design with brand logo by katerina k. via 99designs by Vista
- Product imagery: Showcasing images of your product helps consumers visualize what they’re purchasing. Whether it’s a mouth-watering photograph of your food product or an eye-catching illustration of your beauty product, high-quality visuals entice customers and encourage them to make a purchase.
Source: Product imagery on a label design by ProveMan via 99designs by Vista
- Graphics and icons: Graphics and icons convey important information, highlight key features of your product or simply make your product a desirable item for collectors. Whether it’s a symbol indicating product benefits or a graphic representing product usage, incorporating relevant visuals enhances the effectiveness of your label.
Source: Label design with symbols by Randys via 99designs by Vista
- Backgrounds and patterns: Backgrounds and patterns add depth and visual interest to your label design.

Source: Background visual on a label design by Khramova via 99designs by Vista
Place text and ensure legibility
Text is the voice of your label, conveying important information and enticing consumers to engage with your product.
Organize your text with clear headlines, subheadings and body text. Use font size, weight and color to guide readers to the most important information first.

Source: by maxgraphic via 99designs by Vista
Choose easy-to-read fonts, especially at smaller sizes. Stick to sans-serif fonts for clarity, but feel free to match your brand’s style. Ensure text stands out against the background with contrasting colors or background shapes. Avoid busy backgrounds that can interfere with legibility.
Keep text consistently aligned and evenly spaced. Maintain readability with appropriate line spacing and letter spacing.
Tip:
Be concise when including all the necessary information, such as product name, ingredients and instructions. Use bullet points or short sentences.
5. Prepare for print
Before printing, review the label design thoroughly and make any final adjustments based on feedback or observations. Ensure all elements are correctly positioned and legible.
Then, move on to exporting label design files.
- Export the design in PDF or TIFF format for printing, ensuring design integrity.
- Include bleed (typically 0.125 inches) for edge-to-edge printing and define a safe area to prevent critical design elements from being cut off.
Source: Bleed, trim, and safe line on a product label design by sarapaheylo via 99designs by Vista
- Convert colors to CMYK mode for printing accuracy. Check color accuracy by reviewing color proofs or using color management tools.
How to print labels
Once your label design is finalized and ready for printing, the next step in the label creation process is to print your labels.
During this stage, you’ll need to choose the appropriate paper stock for your labels, carefully select the right finish and coating and ensure you have access to a suitable printer to bring your design to life.
Choose the right paper stock for your labels
Selecting the perfect paper stock for your labels is crucial to achieving the desired look, feel and functionality.
The two most common types are paper and synthetic labels:
- Paper labels: Ideal for standard applications like product packaging, mailing and address labels.

Source: Paper label design by green in blue via 99designs by Vista
- Synthetic labels: Best suited for durable, waterproof or outdoor applications where moisture or weather resistance is required.

Source: Paper label design by green in blue via 99designs by Vista
However, if you want to stand out from the crowd and make your label the real star of the show, consider alternative label paper stock. Use specialty materials like textured or metallic paper for high-end products or unique label designs that require extra visual appeal.
Choose a finish and coating for your labels
In the world of label design, the finish and coating you choose make a significant impact on both aesthetics and durability.
When it comes to finishes, the two most common options you have are gloss vs. matte. Gloss finishes offer a shiny, vibrant look that enhances colors and graphics. Matte finishes provide a softer, more elegant appearance, reducing glare and fingerprints. Choose gloss for vibrant visuals and matte for a sophisticated touch.
Whether to coat your labels or not is up to you. Laminates and varnishes offer protective benefits, increasing durability and resistance to moisture, abrasion and fading. Ideal for labels exposed to harsh conditions or handling, ensuring longevity and maintaining visual appeal.
Choose the right printer
You’ve come up with a label idea, designed your label and prepared it for print. And here comes the most exciting part—printing. Finally, you will see your long-awaited labels come to life.
Here’s the catch, though. To ensure your labels match your vision, it’s crucial to use a printer capable of producing them accurately—with the desired resolution and color accuracy for your label design.
Inkjet printers offer vibrant colors and are suitable for glossy finishes, while laser printers provide crisp text and are better for matte finishes. Consider your label requirements when choosing between inkjet and laser printers.
Design stunning labels
Let’s reflect on the journey of creating stunning labels. From brainstorming what to feature on them to selecting the perfect tools, designing with flair and finally, preparing and printing—each step plays a vital role.
DIY label crafting offers a hands-on approach for small-scale endeavors, but professional printing services like VistaPrint are the true game-changers when it comes to large-scale production.
Why hassle over the printing process when VistaPrint can effortlessly bring your label visions to life? With top-notch quality guaranteed, you can focus on growing your business while VistaPrint takes care of the rest. Your labels will shine, leaving a lasting mark on your customers.
Ready to get started?
Explore all your label printing options today.
