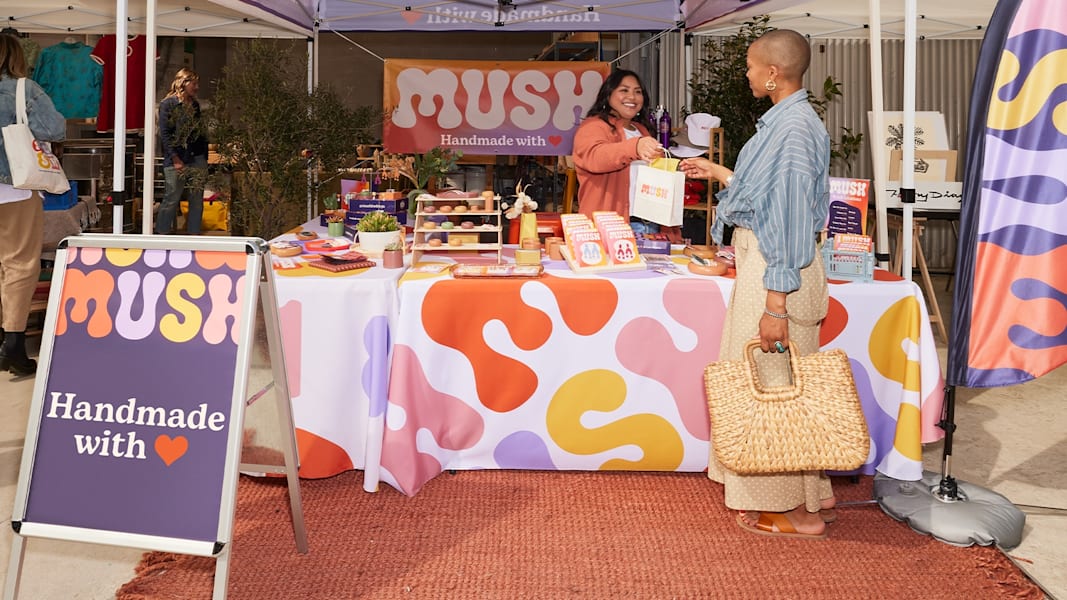
Event planning brings together the people, budget, venue and preparations needed to host a gathering, whether you’re introducing a new product, running a workshop or inviting customers to celebrate a milestone with your business.
For a small business owner, bringing people together can be one of the most rewarding parts of the job. Of course, someone also needs to book the space, organize refreshments and make sure guests know which door to use. If that someone is you, having a clear plan makes the whole thing feel more manageable. A welcoming space, something worthwhile to share and enough time to prepare will take you a long way.
This event planning guide walks you through setting goals, working out your budget and following a 90-day checklist. We’ll also cover venue logistics, registration, branded displays and follow-up, with practical advice you can adapt to your business.
- Base your budget on supplier quotes and keep 10% aside for unexpected costs, so a last-minute change doesn’t throw everything off.
- Use a 90/60/30/7-day event planning checklist to leave time for promotion, print orders and final preparations.
- Think through the guest experience, from finding the entrance to checking in and moving around the room.
- Plan how you’ll track inquiries and sales, then follow up within 24–48 hours while conversations are still fresh.

Define your event goals and target audience
Before you start looking at venues, think about what you’d like the event to achieve for your business. You might want to introduce a new product, get to know local customers or give your regulars a reason to stop by. Knowing that from the start will help you decide where to spend your time and budget.
When you’re figuring out how to plan an event for a small business, it helps to turn that general aim into something you can measure. For example, an accounting practice might want to book 10 introductory calls within two weeks of a tax-readiness lunch. That gives the team a clear reason to leave time for questions and explain how guests can book a call.
The right format will depend on what you want people to get out of the occasion:
- Brand awareness: A candle shop could host a holiday pouring workshop, giving local shoppers a chance to try its products and meet the maker.
- Lead generation: An accounting practice could invite freelancers to a lunch session with practical tax advice and optional consultations afterward.
- Customer appreciation: A clothing boutique could thank regular customers with a preview evening, styling advice and time to browse.
- Team alignment: A landscaping business could bring staff together for a planning morning before its busiest season.

Once you have an idea, picture the people you’d like to attend. What would make the event useful or enjoyable for them, and when could they realistically come? Your customer conversations can tell you more here than a broad description such as “local professionals.”
Those answers should influence the practical details. Guests coming from work might appreciate food and a venue near public transit, while parents may prefer an earlier finish. Ask about dietary and accessibility needs during registration, and use language in your invitations that feels familiar to the people you’re welcoming.
Inviting customers to bring their children? Our r kids’ birthday party planning checklist has ideas for age-appropriate activities that you can adapt for a family-friendly business event.
Set a realistic small business event budget
It’s easy to get attached to a beautiful venue before finding out what everything else will cost. To give yourself a realistic starting point, decide what your business can afford and gather quotes for the biggest expenses. You can then work out what’s left for promotion, printed materials and the smaller details.
The example below shows one way to divide a $2,000 budget. Your own priorities may look different, especially if you can use your store or office instead of renting a space.
| Budget category | Starting allocation | $2,000 example | What it covers |
|---|---|---|---|
| Venue & catering | 40% | $800 | Space rental, refreshments, furniture and service fees |
| Marketing & print branding | 20% | $400 | Signs, table coverings, invitations and promotion |
| Technology & AV | 15% | $300 | Microphones, sound, screens and connectivity |
| Staffing & logistics | 15% | $300 | Check-in support, setup and transportation |
| Contingency fund | 10% | $200 | Unexpected costs and necessary adjustments |
These percentages are a guide, so there’s no need to spend $300 on equipment if your workshop only needs a microphone. You could put the difference toward refreshments or an extra pair of hands at check-in. Just keep the contingency fund separate when moving money around.
How does the 10% contingency rule work?
Set aside 10% of your total budget for costs you couldn’t reasonably plan for. With a $2,000 limit, that means allocating $1,800 to planned expenses and keeping $200 in reserve. It gives you some breathing room if the weather changes or you need to accommodate more guests than expected.
Treat that money as unavailable for everyday additions, however tempting an extra decoration might be. Unexpected venue electrical charges or a necessary change to your outdoor setup could justify using it. Agree on who can approve that spending, and keep a note of what was needed.
As bookings come together, track estimated, confirmed and actual costs alongside payment deadlines. Remember to include taxes, delivery, service charges and staff time, so you can see what the event really costs your business.
A few ways to make the budget go further include:
- Comparing weekday and off-peak venue prices.
- Sharing space or promotional costs with a complementary business.
- Renting equipment you’re unlikely to use again.
- Ordering straightforward printed materials at least three weeks ahead, after checking delivery estimates.
- Combining print orders where it saves on shipping, without holding up anything urgent.
- Buying the signs guests need before adding purely decorative extras.

The master event planning timeline: 90/60/30/7-day milestones
Having everything on one long to-do list can make an event feel bigger than it is. Breaking the steps in event planning into stages helps you see what needs attention now and what can wait. The timeline below suits a modest local event, while larger gatherings may need 6–12 months of preparation.
| When | Event planning checklist | What you’re aiming to have ready |
|---|---|---|
| 90 days out | Agree on goals, set the budget, choose the format and book key suppliers | A clear plan, with responsibilities shared |
| 60 days out | Open registration, begin promotion and order major displays | A live booking page and print production underway |
| 30 days out | Review attendance, check supplier deadlines and prepare guest materials | Confirmed arrangements and remaining artwork ready |
| 7 days out and day-of | Confirm final details, brief the team, organize materials and set up | A prepared team and a welcoming venue |
90 days out: Foundations and visual strategy
With your goals and budget agreed, you can confirm the venue and main suppliers. Read contracts for payment dates and cancellation terms, then keep those details in a shared task board where everyone can find them. This is also a good time to agree on colors, fonts and logo files, so your invitations and signs look like they belong to the same event.
If you’re planning a relaxed customer celebration or team party, our party planning checklist can help you organize the food, entertainment and other details.
60 days out: Promotion and print orders
Open registration and start spreading the word, while getting larger items like backdrops and table coverings ordered. Allowing two months gives you room to check your artwork, inspect deliveries and arrange replacements if needed, although production times vary. Check measurements before ordering and open deliveries when they arrive, rather than leaving boxes untouched until setup day.

30 days out: Finalization and attendee assets
You should now have a clearer picture of attendance, so review registrations and confirm when suppliers need final numbers. Check accessibility arrangements, prepare programs and test printed QR codes before approving the full run. Badge designs can be ready now, even if you’re waiting a little longer to finalize names.
7 days out and day-of: Execution and setup
Put together a printed schedule, often called a run-of-show, with timings, responsibilities, supplier contacts and the floor plan. Pack an emergency kit with gaffer tape, zip ties, spare name badges, markers, approved extension cords and charging banks. Before guests arrive, walk through the space with your team and rehearse anything that needs careful timing.
Choosing the right venue and event logistics
When you visit a possible venue, try to imagine your event already happening there. Where will people gather when they arrive, and can they move comfortably between tables? A room that holds 80 standing guests may feel very different once you add workshop seating, refreshments and a check-in desk.
Ask about capacity for the layout you actually need, then check parking, public transit and the route into the building. If possible, visit at a similar time of day to your event, when you’ll get a better sense of traffic, noise and natural light. Talk through accessibility with the venue, including step-free access, seating arrangements and accessible restrooms.

Check how your equipment will get inside
If you’re bringing large displays, find out where deliveries can unload and how far everything needs to travel. Doorways, elevators and tight corners can become a problem when you’re carrying a packed backdrop stand. Checking dimensions and delivery windows beforehand is much easier than finding another route on the morning.
It’s also worth asking a few questions about how you can use the space:
- Entrance: Is there a visible place for a welcome sign that leaves doors and walkways clear?
- Ceiling height: Will your backdrop fit beneath lights, beams and other fixtures?
- Mounting: Can you use removable adhesive or approved hooks, or must signs be freestanding?
- Lighting: Could sunlight or spotlights make printed messages difficult to read?
- Tables: What are their exact dimensions, including height, for ordering coverings?
- Power and storage: Where can you plug in equipment and keep empty boxes out of the way?
A simple floor plan will help you work out where everything belongs before you order it. Our guide to types of signs can help you choose suitable formats for each area. Before booking, also confirm what the rental includes and how much time you’ll have for setup and cleanup.

Streamline event registration and attendee check-in
Guests will feel more comfortable arriving if they already know what to expect. Your registration page should clearly explain where the event is, when it starts, what it costs and what’s included. Keep the form straightforward, asking for essential contact details and any dietary or accessibility needs, then send a confirmation with travel information and a contact for questions.
At the venue, a clearly marked desk gives guests somewhere obvious to go. Where there’s enough room, positioning it around 10–15 feet inside the entrance can help people get through the doors before joining a line, but check the layout with the venue so routes and exits stay clear.
The best check-in system is one your team feels comfortable using. For a small workshop, an attendee list and alphabetized badges may be all you need, while a larger gathering could benefit from QR ticket scanning and several staffed stations. Pre-printed badges work with either approach, and having names ready saves guests from juggling a pen, coat and coffee when they arrive.
Have welcome materials ready in sets, so guests can collect their folder, program and lanyard together. That leaves staff free to say hello and explain where to go, rather than searching through piles of paper. If you’re giving out bulky bags or gifts, a separate collection point can make the desk easier to manage.
It also helps to have someone watching arrivals, ready to guide people to the right line or find a missing badge. Once the initial rush is over, they can help latecomers settle in without interrupting the session.
Alphabetize pre-printed name badges on flat display trays before doors open, and keep a thermal label maker or blank branded badges and markers tucked under the counter for walk-ins.

Design cohesive event branding and tangible touchpoints
Your event gives people a chance to experience your business in person, so the space should feel like somewhere you belong. Familiar colors, clear signs and a thoughtfully arranged table can do a lot, even in a plain rented room. As you plan, think about what guests need to notice and where a little extra information would help.
“With selling merch online, I do find it hard to find an audience or to build your audience to a level where your shop can gain traction. Versus with events, you put more work into a display that can capture the eyes from others.”– Melanie Liu, Founder of smoleart
Entrance and signage
Good event signage and displays help people feel sure they’re in the right place. An A-frame outside can confirm the entrance, a retractable banner can make registration easy to spot, and freestanding directional boards can point toward the main room or refreshments. Look for the places where someone might hesitate, then put directions where they can see them before making a turn.
Keep messages short enough to understand while walking, with arrows that leave no doubt about the route. Choosing easy-to-read fonts will help, but size and placement matter too. Before opening, ask someone unfamiliar with the layout to follow the signs and tell you where they get stuck.
When choosing backdrops or portable displays, consider how you’ll transport, assemble and reuse them. On a stage, place important branding where furniture and speakers won’t hide it, then take a quick photo to check the view. If guests will spend time outside, these outdoor event marketing ideas can help you plan a setup that’s easy to spot.

Table presentation and booth staging
A well-arranged table makes it easier for people to see what you offer and feel comfortable approaching. Fitted coverings create a neat finish when they match the table’s dimensions, while draped covers give a looser look and can conceal supplies underneath. Whichever you choose, check that the fabric doesn’t trail into walkways or get in the way of seated staff.
A contrasting runner can help your logo stand out against a plain covering. If you’re showing products, stable risers let you create different heights so smaller items don’t disappear behind larger ones. Leave some clear space for demonstrations and conversations, especially if guests might need somewhere to put down a bag.
Attendee collateral
Think about what guests will actually use during the event before deciding what to print. At a workshop, a presentation folder can keep the agenda, notes and worksheets together, so people aren’t carrying loose pages home. For a short preview evening, a simple program card may be enough.
Your printed materials can also make the occasion feel connected from the first invitation onward. Sending event invitations to VIP clients adds a personal touch, while a calendar invitation helps them remember the date. Carry the same colors and design into programs and name badges, with names and practical information given plenty of space.
Takeaway items
The most welcome giveaway is usually something that suits the people receiving it. A notebook makes sense at a workshop, while a canvas tote is useful when guests have purchases or samples to carry. Branded staff apparel can help too, making it easier to spot someone who can answer a question.
If you’re working with a small budget, one useful item is a good place to start. You can find more swag bag ideas once you know what you can spend, but there’s no need to fill a bag for the sake of it. Consider the journey home as well, since a bulky gift may be awkward for someone traveling by bus.
Sustainability considerations
You can reduce waste by leaving dates off reusable banners and choosing sign frames with replaceable inserts. Consider recyclable paper or FSC-certified stock where suitable, checking whether the finished item is accepted locally. Before buying compostable serviceware, confirm that your collection provider and receiving facility accept it, as EPA guidance advises for compostable plastics.
Promote your business event to drive attendance
When you’ve spent weeks thinking about an event, it’s easy to forget that other people are hearing about it for the first time. Explain why they might enjoy coming, whether that’s learning a useful skill, meeting local business owners or getting a first look at a collection. “Learn three ways to prepare your business for tax season” gives someone a clearer reason to book than “Join our networking lunch.”
Your event marketing strategies should reflect how your audience already hears from you. Email may be the best way to reach regular customers, while a poster in a neighboring café could catch the attention of people who haven’t visited yet. Keeping the message and design consistent helps them recognize the event when they see it again.
If you offer early-bird tickets, set a genuine deadline or quantity limit and make sure the reduced price still works for your budget. Review bookings each week to see which channels are helping people find you. That way, you can spend your remaining time where it’s making a difference.
You can build a manageable promotional schedule around these channels:
- Email: Announce the event when registration opens, then plan relevant reminders around 14, three and one day before. People who have already booked should receive useful arrival details.
- Social media: Start sharing when bookings open, with speaker introductions, demonstrations and preparation updates through the final month. Include an easy way to reach the booking page.
- Local print: Ask suitable stores and community spaces about displaying posters or flyers 4–6 weeks ahead. Make the main benefit, date and booking details easy to find.
- Direct mail: Aim to send postcards or invitations around six weeks before the event, allowing time for delivery and replies.
- Community partners: Approach complementary businesses 6–8 weeks ahead, then provide them with copy, artwork and a link they can easily share.
For posters, keep the main message prominent and use poster fonts that make the details easy to read. Our guide to outdoor advertising can also help you think about reaching people nearby.
Measure post-event ROI and lead conversion
Once the event is over, you’ll probably have a good feeling about how it went. Guests may have stayed to chat, asked thoughtful questions or bought more than you expected. A little tracking helps you connect those observations to the goals you set at the beginning.
Before event day, create dedicated links or QR codes for registration and printed materials, so you can see which activities lead to inquiries or purchases. Label each code with a clear reason to scan, for example, “Book your consultation” or “Get the workshop notes.” Scans show interest, but you’ll need booking or sales records to understand what happened next.
It also helps to agree on what makes someone a qualified lead. For an accounting practice, that could be a business owner who needs a relevant service and has asked to discuss it. Make a note of what you promised them and who will follow up, so a useful conversation doesn’t get lost afterward.
These calculations can help you review the results:
- Cost per attendee: Total event cost ÷ actual attendees.
- Cost per qualified lead: Total event cost ÷ qualified leads.
- Attributable net profit: Event-attributable revenue − costs of delivering those sales − event costs.
- Event ROI: Attributable net profit ÷ event costs × 100.
For example, suppose event-related sales bring in $5,000 after the costs of delivering those sales, and the event itself costs $2,000. That leaves $3,000 in attributable net profit, giving you an event ROI of 150%. Count each cost once, including staff time consistently.
Send follow-up messages within 24–48 hours, while people still remember the conversation. Share promised resources and a relevant next step, then review sales after an agreed period, like 30 or 60 days. A short guest survey and team debrief will also help you understand what people enjoyed and what could work better next time.
Ready to plan your next business event?
There’s plenty to think about when you’re hosting an event, but each decision becomes easier once you know who it’s for and what you hope to achieve. Start with those questions, give yourself a realistic budget and work through the preparations one stage at a time. Sharing responsibilities will also leave you more room to enjoy the day and spend time with your guests.
Often, it’s the thoughtful details people appreciate: knowing where to go, being greeted by name and leaving with something useful. Keep those experiences in mind as your plans take shape.
Event planning FAQs
Do I need to hire a professional event planner?
For a straightforward workshop or customer evening, you may be able to handle the planning with your own team. Professional help becomes more useful when you’re juggling several suppliers, complicated staging or a large guest list. A day-of coordinator can be a good middle ground, keeping things moving while you spend time with guests.
How can I include a virtual audience?
Start with the parts of the event that people can comfortably follow online, like a talk or demonstration. You’ll need clear sound, captions and someone to monitor remote questions. Rehearse with a person joining from elsewhere, so you can check what they’ll actually see and hear.
What are the main steps in planning an event?
The main steps in event planning include setting measurable goals, establishing a budget, choosing a venue, creating a timeline, promoting the event and arranging materials like banners and invitations. You’ll also need to organize registration, prepare your team and plan how you’ll follow up afterward.
How far in advance should you start planning an event?
Allow 6–12 months for large corporate or community events, while smaller workshops and local gatherings typically need 2–4 months. Start earlier if you have your heart set on a popular venue or a speaker who books well ahead. Supplier deadlines will help you work out the rest of your schedule.
What should I do if a speaker cancels?
Have a backup session in mind, for example, a staff-led demonstration or a guided discussion, and agree on who could run it. If the change affects a main reason people booked, let attendees know promptly. Explain what’s happening instead and what options are available under your booking terms.
How can I help guests who arrive alone feel comfortable?
A friendly introduction can make a big difference. Ask a host to welcome solo arrivals and introduce them to someone with a shared interest, without putting them on the spot. Optional conversation prompts or a short paired activity can help, while leaving people free to settle in at their own pace.
What if bad weather threatens an outdoor event?
Arrange an indoor alternative or a clear postponement plan before bookings open. Agree with the venue and suppliers on when you’ll make the decision, then tell guests how they’ll receive updates. That gives everyone a plan to follow if the forecast changes.

